Using the Import Wizard
The Import Wizard has several tabs that allow you to configure the source file information, variables to use for column mapping and transforms, and mapping the data to the system.
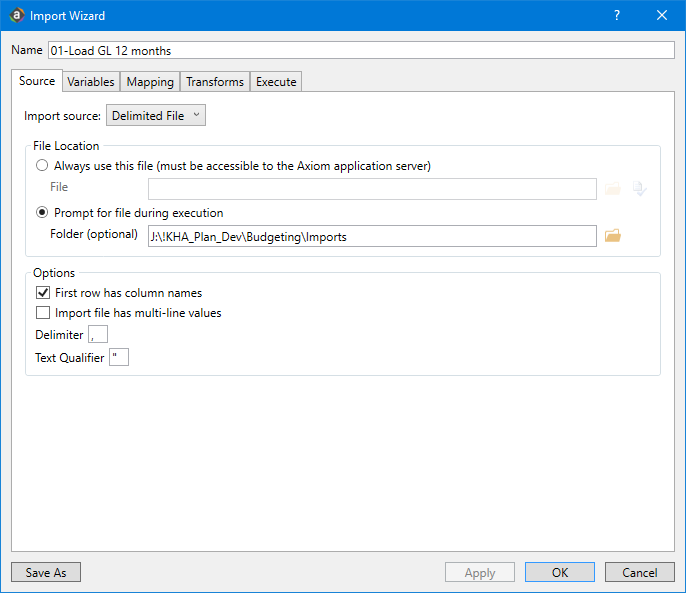
As part of the configuration process, you can set an import to always look in the same location for the data source or prompt for a location each time you execute the import. You can also indicate whether the first row contains column names, whether the import includes multi-line values, the field delimiting character and the text qualifying character.
As you complete the import settings, the Import Wizard performs error checking for missing required settings and invalid settings. If the destination table has linked columns (columns that are assigned to a lookup column), data is automatically validated against the lookup column before importing. If an error is detected, an error message displays in the bottom of the dialog.
TIP: Before you begin the process of importing data, we recommend that you consult the file review checklist to ensure the data is ready to import into the system to make this process go smoother.
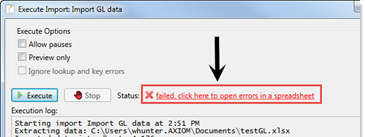
Click the link to open a spreadsheet that contains the errors.
Source tab
The Source tab of the Import Wizard specifies the source of the data to be imported. The contents of the tab depend on the Import source selection at the top of the tab.
| If you are importing data from... | Use one of the following options... |
|---|---|
|
An external database |
|
|
A file |
|
|
A table in the current Kaufman Hall database |
|
NOTE: You can also use the OLEDB source type to import a file. To import from a file that is not one of the Axiom symptom's supported file types, you may be able to use the OLEDB source type. The database connection strings can be configured to pull data from various file types. For more information, contact your Kaufman Hall Implementation Consultant or Kaufman Hall Support.
To view the detailed requirements and import settings for each import source, see Import Sources.
Variables tab
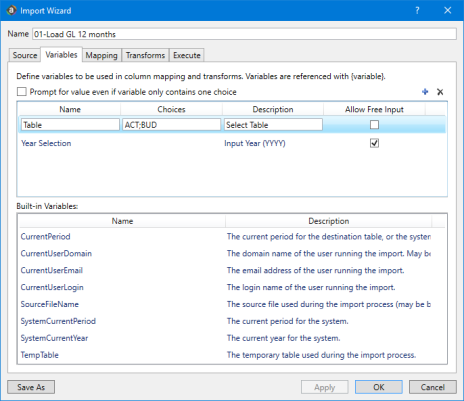
In the Variables tab of the Import Wizard, you can define variables to use in the import. You can limit the options to a finite number of predefined choices, or you can allow end users to free-enter any value when the import is run.
Variables can be defined however your organization pleases, though Axiom Software reserves a number of predefined values used in import queries such as CurrentPeriod, TempTable (the temporary table where imported data is stored for performing transformations), and SourceFileName. You can use Import variables in the following import settings:
- Source and destination columns (Mapping tab)
- Destination table (Mapping tab)
- Transform statements or functions (Transforms tab)
- SQL SELECT statement to the source table (Source tab)
- Source file (Source tab)
- Sheet name (Source tab)
When the import is executed, before any import steps are processed, the Axiom system checks the Variables tab for variables. If variables are defined (regardless of whether they are used in the import), the Variables dialog displays. After the user specifies a value for each variable, the import begins processing.
For example, you might have database tables that have the year incorporated into the table name. You could define a variable for year, and configure the destination table to use the variable. Data would then be imported into the appropriate table, depending upon the year selected by the user.
To use a variable in the import, enter the variable name into one of the supported areas of the import settings, enclosed in curly brackets {}. For example, if the variable is "column", you would enter {column}.
If the variable defines the destination table, then you must place the variable in double curly brackets when you use it in a SQL statement, so that the eventual table name value is enclosed in curly brackets as expected. For example, if you have a variable named "destinationtable", you would reference that variable as {{destinationtable}}. That way, when the {destionationtable} value is defined, it will resolve as {GLThisYe... GL2017}.
This tab has two sections. In the top section, you can create user-defined variables for the import. The bottom section displays the built-in system variables that can be used in the import, such as temptable. This Built-in Variables section is for reference only.
-
To add a variable, click Add variable. The new variable row is added below the row that is currently selected.
-
To edit a variable, type the changes into the grid.
If you change the name of a variable, you must update any references to that variable in the import to use the new name.
-
To delete a variable, select the row to delete, and click Remove variable.
Make sure the variable is not used in the import before deleting it. If the import references a variable that is not defined, an error occurs when executing the import.
The following settings are defined for variables:
|
Item |
Description |
|---|---|
|
Prompt for value even if variable only contains one choice |
This setting applies to all defined variables for the import, and determines the system behavior when a variable has only one choice.
|
|
Name |
The name of the variable. Import variable names cannot use the same name as transform variable names, and vice versa. Every variable name within the import must be unique. NOTE: Import variables cannot use the same names as tables defined in your system. This is because the syntax for referencing tables is the same as the syntax for referencing variables. A validation message displays in the Import Wizard if a variable name matches a table name. If a table is later created with the same name as an existing variable, then subsequent executions of the import will fail with an error identifying the table name / variable name duplication. |
|
Choices |
The set of valid choices for the variable, separated by semi-colons. You can leave the choices blank if there is not a defined set of values for the variable. When the import is executed, the user can type in a value for the variable (if Allow Free Input is enabled). You can also specify a column or columns in the database by entering fully qualified Table.Column syntax. The user is presented with a drop-down list of all values (up to 500) in the specified column. For example, enter DEPT.Region if you want the user to select from the list of regions in the DEPT table. You can specify multiple database columns, separated by semi-colons. For example, DEPT.VP; DEPT.Mgr. The column values will be collected into a single list. |
|
Description |
Optional description text that displays in the Variables dialog. This dialog displays when the import is executed, to prompt the user to specify a value for the variable. Description text displays as follows above the variable selection drop-down list: VariableName:DescriptionText |
|
Allow Free Input |
Specifies whether users can type in their own values for the variable, or if they are restricted to the list of choices.
|
Mapping tab
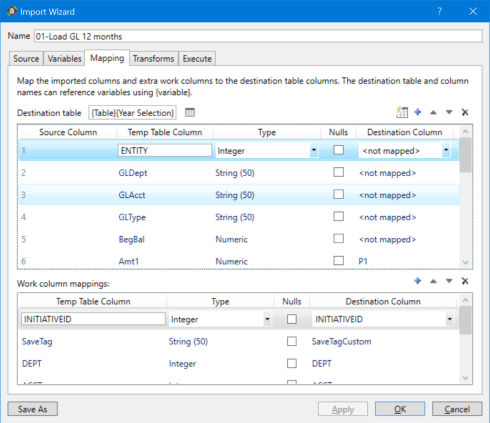
The Mapping tab of the Import Wizard maps the import data to the destination table. In this tab, you define:
- The columns to create in the temptable, including any "work columns" to use for interim calculations only.
- The destination table for the imported data.
- The destination columns for the imported data.
Data is first imported from the source file or table into the temptable. Each entry in the Temp Table Column field becomes a column in the temptable. After performing any mappings or calculations on the temptable (as defined in the transforms), data is imported from the temptable to the destination table. The entries in the Destination Column field determine whether a column of data is imported to the destination table and to which column in the destination table.
This tab has two sections. The top section is for mapping imported data columns from the source file or table, and the bottom section is for work columns.
You can use variables in the Destination table field, the Temp Table Column field, and the Destination Column field.
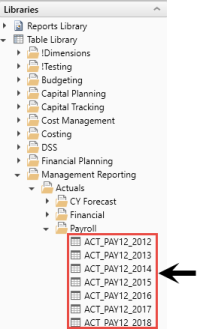
To view the destination tables to verify an import, do the following:
- In the Explorer task pane, in the Libraries section, click Table Library > Management Reporting > Actuals.
- Select the sub-folder for the table to view.
-
Double-click the spreadsheet icon.
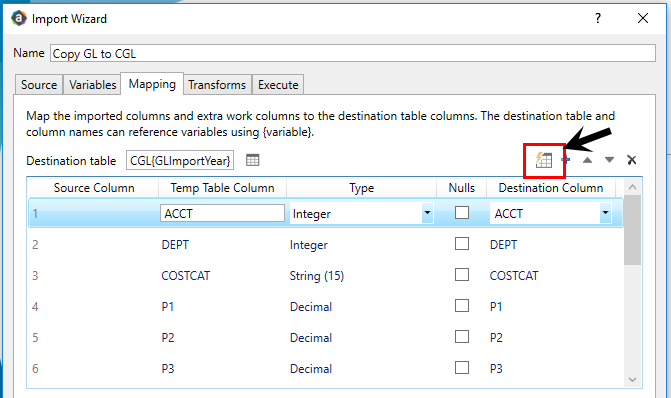
The top section of the Mapping tab must contain a row for each column of data to be imported.
The columns must be listed in the order of the columns in the source. For example, the first column of the source file must be row 1 in the mapping grid, the second column must be row 2, and so on.
You can click Auto-generate temp table and destination columns to auto-generate an entry for each column in the source table or file. The import source settings must be complete and accurate to do this, and you must have specified the destination table. Axiom Decision Support will attempt to auto-populate the data types and destination columns for each column of data in the source table or file. After auto-generating, review all entries to be sure they are correct.
NOTE: If the import source is set to Prompt for file during execution, then when you click Auto-generate, you are prompted to select a file to use for the auto-generated mappings.
You can also define columns manually, or edit the settings after auto-generating:
- To add a row, click Add imported column mapping. The new row is added below the row that is currently selected.
- To edit a row, type changes into the grid.
- To delete a row, select the row to delete and then click Remove mapping.
- To change the order of rows, select the row that you want to move and then click the arrow icons to move it up or down.
NOTE: If you perform any action that changes the existing order of rows, this may cause data to import incorrectly. After making manual adjustments to the grid, check to make sure that each mapping row in the grid matches up with the appropriate source column.
Mapping settings
| Item | Description |
|---|---|
|
Destination table |
The destination table for the imported data. You can select any data or reference table. You can also use an import variable. |
|
Source Column |
The number of the corresponding source column in the import source. The first row in the grid corresponds with the first column in the source, and so on. You cannot edit these numbers. If you auto-generate the mappings, the name of the source column displays next to the number for reference. Names only display when the import source is a database or a file with a header row. |
|
Temp Table Column |
The name of the column to create in the temptable to hold the imported data. The column name does not have to match the name of the column in the source. The data is imported in column order, not by name. You can use import variables to define temptable column names. NOTE: Temptable column names must follow the same rules as normal table columns. Keep in mind that if you auto-generate the column mappings, the temptable column names are based on the headers in the source. These headers may contain spaces or other invalid naming conventions that should be manually corrected. |
|
If the data type is String, you must also specify the maximum length of the string field. This entry should match the string length of the destination column so that data is saved appropriately. To specify the string length, click the browse button (...) to the right of the field. In the Edit String Length dialog, type the string length (from 1 to 4000). The string length displays in parenthesis after the data type. For example: String (200). The type must match the type of the destination column. The type is automatically selected when you use the auto-generate feature or when you manually select a destination column. You only need to manually select a type if the column is only for the temptable and does not have a destination column. NOTES:
|
|
|
Nulls |
Determines how blank values in the import source are brought into the temptable column.
This setting can impact transform statements that look for "blank" or undefined values in the temptable. You should set this as appropriate depending on whether you want to check for null values or the default value for the affected column. The presence of null values in the temptable does not necessarily mean that the imported data will contain null values. When the temptable values are imported into the destination table, the default values for the destination columns are always applied to any null values at that point. However, if the default value for a destination column is null, then the null values are retained. |
|
The name of the column in the destination table where you want this data to be saved. You can type the name of the column directly, or use the drop-down to select a column name. The data type of each column displays in the drop-down list for reference. The data type of the destination column must match the data type specified in the mapping grid. If this column is not intended to be saved to the destination table, select <not mapped>. "Not mapped" is the default if you do not explicitly select a destination column. You can use import variables or transform variables to define destination column names. If you use a variable for a destination column and you want to set the column to not mapped, the value of the variable must be blank for import variables and empty string ('') for transform variables. |
You can use work columns in the temptable to perform calculations and mapping on the data before saving it to the destination table. Any column defined in the Work column mappings section is created in the temptable. If a destination column is specified, the data is saved to the destination table.
- To add a row, click Add work column mapping.
- To edit a row, type changes into the grid.
- To delete a row, select the row to delete, and click Remove mapping.
- To change the order of rows, select the row that you want to move, and click the arrow icons to move it up or down.
Mapping settings
| Item | Description |
|---|---|
|
Temp Table Column |
The name of the work column. You can use import variables to define temptable column names. Temptable column names must follow the same rules as normal table columns. |
|
Type |
See the Type entry in the previous table for more information. |
| Null |
Determines the starting values for work columns in the temptable (before transforms are applied).
This setting can impact transform statements that look for "blank" or undefined values in the temptable. You should set this as appropriate depending on whether you want to check for null values or the default value for the affected column. The presence of null values in the temptable does not necessarily mean that the imported data will contain null values. When the temptable values are imported into the destination table, the default values for the destination columns are always applied to any null values at that point. However, if the default value for a destination column is null, then the null values is retained. |
|
Destination Column |
The name of the column in the destination table where you want this data to be saved. If this column is used only for calculations in the temptable and is not intended to be saved to the destination table, select <not mapped>. See the Destination Column entry in the previous table for more information. |
- If you select to auto-generate the column mappings and either the import source or the destination table uses variables, then the Variables dialog displays so that you can specify variable values to use to generate the mappings.
- If the destination table uses a variable and you are manually creating column mappings, then the selections in the destination column drop-down lists are based on the first choice listed for the variable.
Transforms tab
The Transforms tab of the Import Wizard contains a set of statements to perform actions on the data in the temptable to transform the data before saving it to the destination table.
When the import is executed, the transforms are processed after import variables have been selected and after the data query has been made to the source table or file. Transforms are processed in the order listed in the tab.
Transforms can use SQL statements or built-in Kaufman Hall transform functions.
NOTE: Transforms are configured during implementation by your Kaufman Hall Implementation Consultant. You can edit the SQL statements to change how data is transformed, however, we would typically recommend to not attempt this on your own. For those familiar with SQL, example transforms are provided. If you are not comfortable writing SQL statements but feel you need to modify how import data is transformed, please contact Kaufman Hall Support for assistance.
-
To add a transform, click Add transform. The new transform is added below the row that is currently selected.
-
To duplicate a transform, select the row to duplicate, and click Duplicate selected transform.
-
To edit a transform, make changes directly in the grid.
-
To delete a transform, select the row to delete, and click Remove transform.
-
To change the order of transforms, select the row that you want to move, and use the arrow icons to move it up or down.
The following settings are defined for each transform:
|
Field |
Description |
|---|---|
|
Number |
The ordinal number assigned to each transform to determine processing order. This setting is managed by the Axiom system. When you change the order of rows, the system automatically changes the order number. |
|
Transform |
A SQL statement or a built-in Kaufman Hall import function. To define the transform, double-click the field or click the browse button (...) in the field. The Edit Transform dialog displays so that you can define the transform. |
|
Description |
Displays the description of the transform. This is for reference only. You can define this description when defining the transform. |
| Target Variable |
Displays the name of the target variable for the SQL transform. For SQL statements, target variables are defined when editing the statement. Target variables do not apply to import functions. |
|
Pause check box |
Select the Pause check box to pause the import and display the templatetable after processing this transform. This option only applies if the user selects Allow pauses when executing the import. |
|
Disable check box |
Select the Disable check box to disable the transform. When the import is processed, this transform is skipped. |
If the import contains a transform that zeroes old data before importing the new data, use the Pre-Save Validate function before the zero step. This allows you to identify any data issues before deleting existing data. If invalid data is found, the import is aborted, and the zero step is not processed.
Execute tab
Using the Execute tab, you can define execution settings, run the import, and monitor its progress.
NOTE: This tab is not visible to non-administrator users who do not have Execute permissions for the import.
The following options affect the execution of the import.
|
Option |
Description |
|---|---|
|
Allow pauses |
Specifies whether pauses are honored during processing.
This option is only available to users with read/write access to the import. This option only applies to the current execution of the import; it is not saved in the import settings. |
|
Preview only |
Specifies whether the import is run in "preview mode."
IMPORTANT: When an import is run in preview mode, all of the steps in the Transforms tab are performed, including any steps that modify tables other than the temptable. If you do not want these steps to occur as part of a preview, then disable the step on the Transforms tab before executing the preview. This option only applies to the current execution of the import; it is not saved in the import settings. |
|
Ignore lookup and key errors |
Specifies the import behavior if lookup and key errors exist in the temptable data before saving. These errors include invalid lookup data, blank keys, and duplicate keys (if saving to a reference table or if Aggregate rows on final save is disabled).
This option is only available to users with read/write access to the import. This option is saved in the import settings and apply to future executions of the import by default. NOTES:
|
|
Aggregate rows on final save |
Specifies whether duplicate rows are aggregated during the final save to the destination table. Duplicate rows are rows that have the same key column values.
This option is only available to users with read/write access to the import. This option is saved in the import settings and will apply to future executions of the import by default. This option only applies when saving data to a data table. If you are saving data to a reference table, rows are never aggregated and duplicate keys are not allowed. |
You can optionally enter a description for the import. You can use the description to document the purpose of the import and/or to detail important import instructions. The description is limited to 2000 characters.
Click Execute to run the import. To stop the execution, click Stop.
As you complete the import settings, the Import Wizard performs error checking for missing required settings and invalid settings. If the destination table has linked columns (columns that are assigned to a lookup column), data is automatically validated against the lookup column before importing.
The Execution log displays the process steps of the import as it executes. If errors occur, they are displayed in the log. You can click the link to go to the tab that contains the error. Only one error displays at a time. After you resolve the current error message, a new message may display.
